Beer Can Chicken, aka Beer Butt Chicken, or Chicken
on a Throne
|
I start by brining the chicken. Brining poultry or pork
adds moisture to the meat. This makes the meat cook quicker
on the grill. The meat will be juicier and more flavorful.
Basic brine for chicken, turkey, or pork
4 cups of water
1 tablespoon salt (non iodized is best)
1 tablespoon sugar (or other sweetner such as brown sugar)
make enough brine to completely cover the chicken or pork.
If necessary, put a coffee mug or something on the chicken to keep
it submerged in the brine. Place in the refrigerator while
brining.
To this basic brine you can add appropriate spices, such as
rosemary for pork, or poultry seasoning for chicken etc, use your
imagination. You can also use Sage, celery seeds, parsley
flakes, rosemary, garlic powder, onion powder, pepper sauce,
basil, tarragon, thyme, lemon lime or orange zest. Anything
you would normally use to season poultry or pork.
For chicken, 2 tablespoons of buttermilk powder will really
enhance the brines flavor.
When I make beer can chicken, I use Brown Sugar for the sweetner,
and add poultry seasoning, granulated garlic, and rotisserie
chicken spices to the basic brine
brine for AT LEAST 2 hours, overnight is best. Best is
betweeen 12 to 16 hours for chicken or pork, but some people I
know brine pork for 2 to 3 days.
 |
|
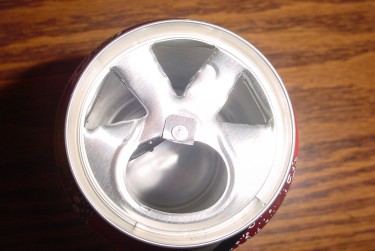
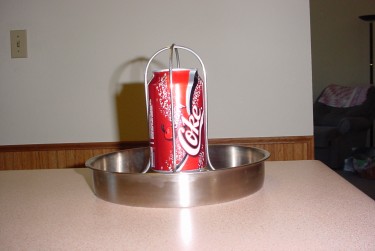
Here you can see where a church key was used to add additional
holes to the Beer Can Top, and if you
want to get fancy, you can buy a beer can holder with a drip
pan. No, Coke hasn't started making beer,
that's all I had available for the pic. The holder is more
stable than using just a beer can by itself.
To prepare the chicken for the grill, remove the chicken from the
brine. Put the whole chicken into a 13 X 9 baking
dish. The baking dish is to help eliminate some of the
mess. A cookie sheet also works. Pour Italian dressing
into the body cavity and on the outside skin of the chicken.
The Italian dressing adds flavor and gives the spices
something to stick to. Sprinkle rotisserie
chicken spices into the body cavity. With the body cavity
pointing up, sprinkle rotisserie chicken spices on the outside
skin of the chicken. In the wings underarms (so to speak)
under the legs everywhere you can from the bottom of the
chicken. Open a can of beer, and remove the tab.
I use a church key to add additional holes in the top of the beer
can. Pour out a little beer so that the beer can is about
3/4 full. Be sure to put the excess beer in an appropriate
container, i.e. the cook. Put the beer can in the middle of
the 13 X 9 baking dish, and slide the chicken's body cavity over
the beer can. The beer can should support the chicken in an
upright position. Now sprinkle more rotisserie chicken
spices on the rest of the chicken. Let the chicken set for
about 10 minutes to absorb some of the flavor of the Italian
dressing and rotisserie spices before cooking. See
picture below for a chicken ready for the grill.
The beer can supports the chicken in an upright position, so the
fat really drains off well, yielding leaner chicken. Just
like an aluminum nail in a baked potato conducts heat into the
potato, the beer can also conducts heat into the inside of the
chicken. Also, as the beer evaporates, it adds flavor and
moisture to the chicken.
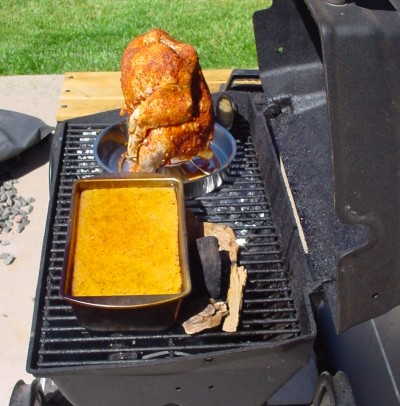
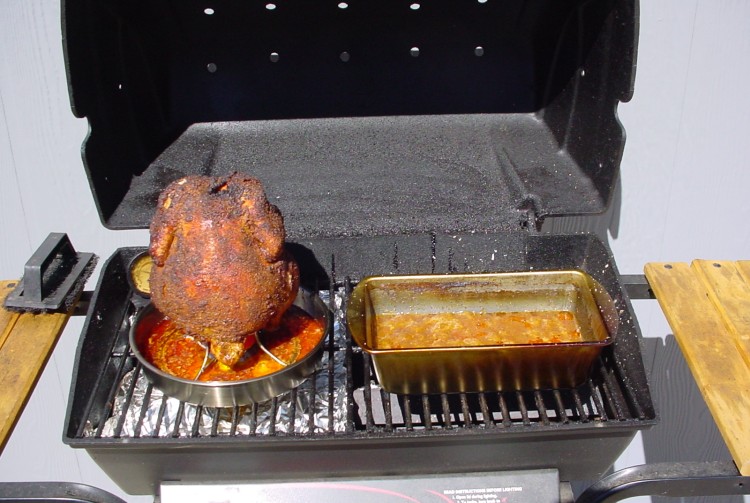
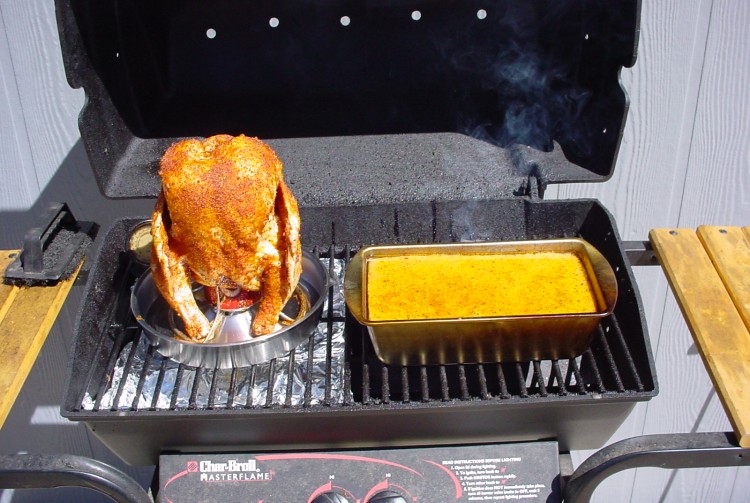
READY TO START COOKING
|
Above, you can see the warming racks have been removed, the
aluminum foil pan is in place, and the
water pan (a cheap bread pan) is filled with water and Italian
Dressing, and excess spices. You can also
notice smoke rising from the hickory chips behind the water pan.
To prepare the grill:
I have a dual burner propane grill, but you only use one
burner. If you have the two warming racks that swing up with
the lid, these will have to be reomoved for the chicken to
fit. Under the main grill where the chicken will
sit, and over the unlit burner, I put a pan that I fashion out of
aluminum foil to catch the fat that drains off. Otherwise
you have a big mess. Light the burner not
covered with aluminum foil (Duh), set it on the lowest setting,
and put the chicken over the burner that is NOT lit, thus using
indirect heat to cook the chicken.
Over the lit burner, I put a cheap metal bread pan that I only use
for this. In this pan I put the excess Italian dressing from the
13 X 9 baking dish, and any remaining from the dressing bottle,
then fill with water. This water will boil and add moisture
to the cooking environment.
I also soak hickory chunks in water for at least an hour (two
hours is better), and put these over the lit burner to add smoke.
Notice the soaked Hickory chips behind the water pan.
I put a cheap oven thermometer on the grill next to the chicken,
and monitor the temp. Best is between 250 degrees and
300 degrees.
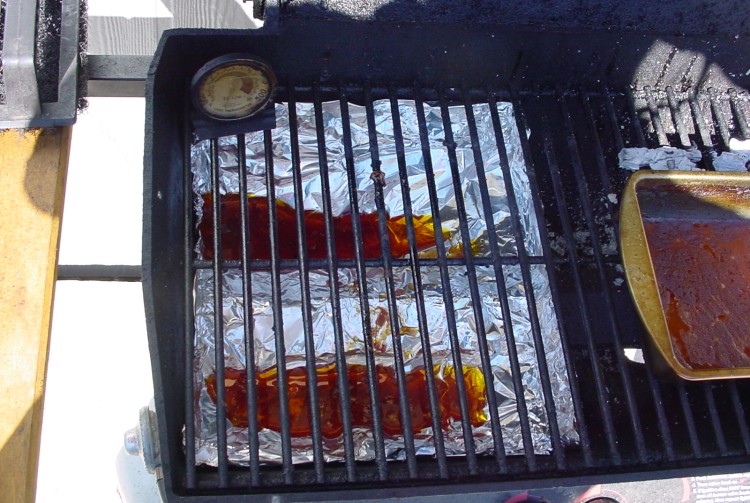
Cook for 3 to 3 1/2 hours till done, and you get this:
Notice I still use the aluminum foil pan in the bottom of the
grill, even with the built in drip pan, as it
does not catch every thing. Also notice how much the water
pan boiled down.
If you do not use the beer can holder with the build in drip
pan, this is how much grease will end up in
your aluminum foil pan. The grill would be a mess, probably
a flaming mess, with out it. Some people
suggest putting water in the drip pan to avoid dripping grease
from flaring up.
You can also cook the chicken in the oven. Prepare the
chicken as above, then bake in the oven in a shallow pan with a
grill. You can buy pans like this. The grill allows
the fat to drain into the pan and the chicken doesn't sit in the
fat while cooking. Put and inch or so of water
in the pan so the dripping fat doesn't flare up in flames.